How to convert or migrate a WordPress site to Django
Have you ever seen a beautifully designed WordPress website and wondered how to bring that same functionality and design into Django? Or perhaps you already have a WordPress site and want to migrate it to Django for better performance, flexibility, and control. In this step-by-step guide, we will show you how to convert or migrate a WordPress site to Django, making the process straightforward even for beginners.
When it comes to website performance, Django often outperforms WordPress. Django is a high-performance Python web framework designed for building complex, scalable, and high-traffic websites. Its clean and optimized code structure allows for faster page load times and more efficient resource management. WordPress, while incredibly popular for its ease of use and flexibility as a content management system (CMS), can sometimes become slow due to heavy reliance on plugins and themes.
In this guide, we will cover everything from migrating your content and images to organizing your templates and static files, ensuring your new Django site not only mirrors your WordPress site visually but also loads faster and is easier to maintain. Whether you’re a developer or a website owner looking to upgrade your site, this tutorial will give you the tools and confidence to complete the migration successfully.
Ultimately, a website’s loading speed depends on several factors, including server configuration, caching mechanisms, image optimization, and overall site design. While Django is generally recognized for its strong performance capabilities, both Django and WordPress can be optimized to achieve fast loading times when the appropriate techniques and tools are applied.

Have you ever wondered why there are so many WordPress themes and plugins available? The answer lies in WordPress’s complex folder structure. Even a small change or customization often requires installing a plugin, which can be overwhelming for beginners. In fact, this complexity can challenge even experienced developers, making it difficult to fully understand, maintain, and control a WordPress site.
On the other hand, Django offers a cleaner and more organized framework. With Django, you have full control over your code and site structure, which makes customizing functionality and design more straightforward. This clarity allows developers to build scalable, high-performance websites without relying on numerous plugins or third-party tools.
Another major advantage of Django is performance. While WordPress is convenient and flexible, its extensive use of plugins and themes can sometimes slow down websites. Django, being a high-performance Python web framework, executes optimized code efficiently, often resulting in faster load times. Of course, website speed also depends on factors like server configuration, caching, image optimization, and overall design, but Django’s framework provides a strong foundation for high-speed, scalable websites.
In this guide, we will focus on converting a WordPress site to Django, helping you retain your existing design while improving performance and maintainability. If you are new to Django, check out our Django Introduction Tutorial. You can also learn more about WordPress here.
Django website versus WordPress
Before we dive into how to convert or migrate a WordPress site to Django, let’s take a moment to compare the speed and performance of the two platforms. For those who don’t know me, I’m a full-stack developer with 7 years of experience in WordPress and 5 years of experience in Python and Django. I currently work as a full-stack developer and web hosting technical support engineer.
In general, Django websites tend to be faster than WordPress websites for several reasons:
Django websites are generally faster than WordPress websites due to several reasons:
- Lightweight framework: Django is a high-level Python web framework that is known for its performance and scalability. It is designed to be lightweight and efficient, making it faster than WordPress, which can sometimes be bloated with unnecessary features and code.
- Efficient coding practices: Django follows best coding practices and encourages developers to write clean and efficient code. This results in faster loading times and improved performance compared to WordPress, which may have less optimized code due to its wide range of themes and plugins.
- Built-in security features: Django comes with built-in security features, such as protection against common web vulnerabilities like SQL injection and cross-site scripting. This reduces the risk of security breaches and potential slowdowns caused by malicious attacks on the website.
- Scalability: Django is highly scalable, allowing websites to handle a large amount of traffic without sacrificing speed or performance. This scalability makes Django websites better equipped to handle high traffic volumes compared to WordPress sites.
- Superb caching mechanisms: Django has robust caching mechanisms that help improve website speed by storing frequently accessed data in memory. This reduces the time needed to retrieve data from the server, resulting in faster loading times for users.
WordPress is one of the most popular content management systems (CMS) in the world. It is flexible and user-friendly, allowing even those with no coding experience to create a functional website within minutes. If your goal is to quickly set up a personal website or blog with minimal effort, WordPress is an excellent choice.
However, if speed, security, and full control over your website are your priorities, Django is the better option. Although I have been using WordPress for over six years, Django has become my preferred framework, and I have completed numerous projects using it. Unlike WordPress, Django gives you complete control over your site’s source code. While hand-coding in Django can be more challenging, it ensures cleaner code, eliminates unnecessary scripts and plugins, and removes concerns about frequent platform updates.
Now, let’s dive into how to convert or migrate a WordPress site to Django.
How to convert or migrate a WordPress site to Django
As mentioned earlier, creating a website in Django requires some coding knowledge, as it does not support drag-and-drop functionality like WordPress. It’s important to be familiar with Django if you plan to manage the site on your own. However, coding in Django is not as difficult as it may seem. Building a website is straightforward and even enjoyable if you have a basic understanding of HTML, CSS, and some JavaScript. For more complex or data-driven websites, such as e-commerce platforms, you will want to explore Django’s advanced features and tools.
Another important consideration before converting your WordPress site to Django is ensuring that your web hosting provider’s cPanel supports the Setup Python App option. This feature makes it easy to create and configure Python projects. Many hosting providers, such as Scala Hosting, currently do not support this feature.
While there are alternative ways to set up Django and Python projects via cPanel, these methods can be challenging for beginners. If you don’t have a hosting provider or are considering switching, I recommend A2 Hosting, which fully supports the Setup Python App. You can also consider signing up through my other website, Sitepare.com.
Even though this tutorial demonstrates the migration on a local environment, it’s a good idea to ensure your hosting setup is ready if you plan to deploy your Django site online after the migration.
To make this guide easier to follow, I have divided it into two sections. In this first section, we will focus on converting only the home page of a WordPress site into Django. In the next section, How to Migrate WordPress Pages and Posts to Django, we will migrate the remaining pages, posts, and other content from WordPress into the Django site. You can also watch the video version of this tutorial here.
There are many approaches to migrating a WordPress site to Django, but I prefer a hands-on, code-focused method. While this approach requires more time and effort, the results are far more reliable and maintainable. Even when working with WordPress, I strive to minimize the use of plugins and pre-made templates to maintain full control over the site’s code and functionality.
While there are plugins available that can make the migration process faster and easier, they often come with drawbacks. Using a plugin can result in migrating errors, unused scripts, unwanted media files, and broken links. Personally, I prefer not to rely on plugins for this reason.
Manually migrating a site allows you to identify and fix these issues, optimize the code, and improve the overall performance of your website. Now, let’s dive into how to convert or migrate a WordPress site to Django.
How to convert or migrate a WordPress site to Django ( Step 1 )
The first step is to create a virtual environment for the project by running:
py -m venv env
The command py -m venv env is used to create a virtual environment in Python using the built-in venv module. Here is a breakdown of the command and its components:
- py : This is the Python launcher command that helps in running Python scripts and managing Python installations on the system. It can be used to execute various Python tasks and manage different Python versions installed on the system.
- -m : This option is used with py to run a specific module as a script. In this case, we are using it to run the venv module.
- venv : This module is used to create lightweight "virtual environments" in Python. A virtual environment is an isolated environment where you can install packages and dependencies for a specific project without affecting the global Python installation.
- env : This is the name of the directory (or folder) where the virtual environment will be created. You can replace env with any other name you prefer for your virtual environment.
When you run the command py -m venv env , Python will create a new directory named venv (or the name you specified) in the current working directory. Inside this directory, Python will set up a fresh virtual environment with its own Python executable, site-packages, and other necessary files.
I want to setup my virtual environment on my desktop. For this, open your terminal or powerShell and navigate to the desktop by typing
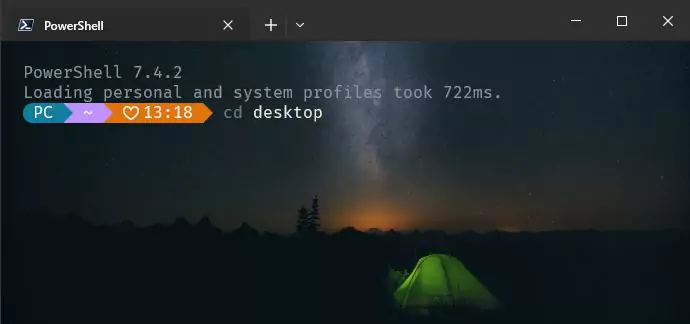
If your Windows Terminal looks different from mine, don’t worry. I’ve customized mine to look better in a separate tutorial, but this won’t affect anything we’re doing here. Just press Enter to return to your desktop. Then, in the terminal, run py -m venv env.
If you encounter an error, it likely means that Python or Django is not installed or not properly configured on your system. Please refer to our comprehensive guide on how to install Python and Django to resolve this. If the command py -m venv env runs without any errors, it confirms that the virtual environment has been successfully created on your desktop. Next, we’ll navigate into the newly created virtual environment and begin building our website.
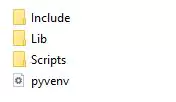
If you check your desktop, you should see a new folder named env. Inside this folder are several subfolders along with a Python script. These files are essential for the virtual environment, even though we won’t be working with them directly.
Now let’s begin creating the site. In the terminal, navigate into the newly created virtual environment by typing cd env.
Keep in mind that env is simply the name of our virtual environment. If you chose a different name, be sure to replace env with the name you used.
How to convert or migrate a WordPress site to Django ( Step 2 )
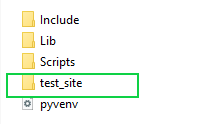
While inside the env directory, create a new Django project named test_site by running django-admin startproject test_site in the terminal.
test_site is the name I chose for this project, but you’re free to use any name you prefer. Just be sure to follow Django’s naming conventions: avoid spaces and hyphens. For example, test-site and test site are invalid and will result in errors. To separate words, use an underscore (_) or camelCase, such as testSite.
If you check the env folder again, you should now see a new folder with the name you specified. This is the main project directory, and it will contain all the components of your website.
At this point, we can start the Django server to check if our site is running correctly. In the terminal, navigate into the newly created project folder by typing cd test_site. Once inside the test_site folder, run py manage.py runserver. This command will start the Django development server.
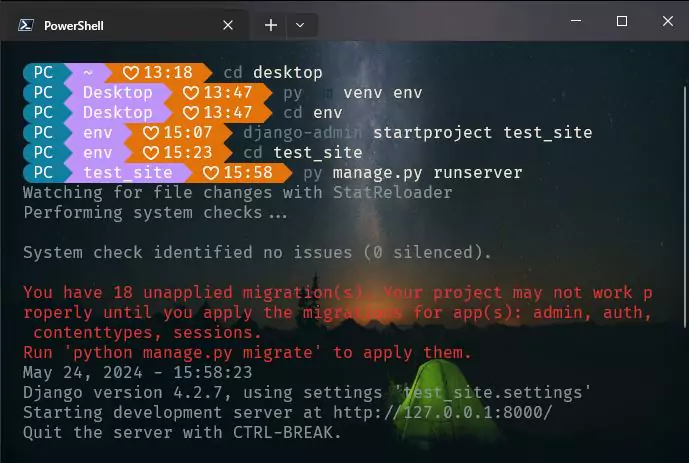
If you see a message in the terminal like the one below, congratulations! The server is running. To view your site, you can either press and hold the Ctrl key and click the http://127.0.0.1:8000/ link in the terminal, or simply open your web browser and enter 127.0.0.1:8000 in the address bar.
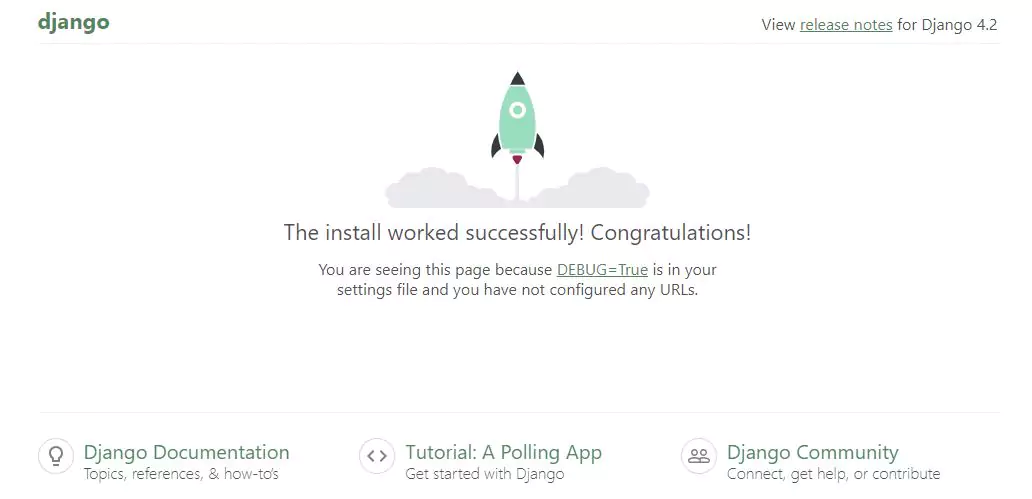
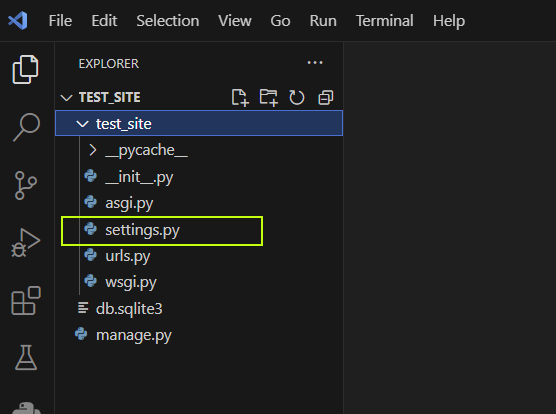
This should open up the default Django page. All we need to do now is to start customizing this page. Since we already have our WordPress site ready, let's begin the migration. Open the test_site folder with your favorite code editor and let's make some changes to the settings.py
In the settings.py file, add the following line at the top: import os. You can place it just before the existing line from pathlib import Path.
import osIn the same settings.py file, scroll down to the TEMPLATES = [ ] section, as shown below.
            TEMPLATES = [
                {
                    'BACKEND': 'django.template.backends.django.DjangoTemplates',
                    'DIRS': [],
                    'APP_DIRS': True,
                    'OPTIONS': {
                        'context_processors': [
                            'django.template.context_processors.debug',
                            'django.template.context_processors.request',
                            'django.contrib.auth.context_processors.auth',
                            'django.contrib.messages.context_processors.messages',
                        ],
                    },
                },
            ]
Inside the empty list literal, we need to add a configuration that tells Django where to find the templates folder for our website. Add the following code within the list:

Your code should now look like this:
		TEMPLATES = [
			{
				'BACKEND': 'django.template.backends.django.DjangoTemplates',
				'DIRS': [os.path.join(BASE_DIR, 'templates') ],
				'APP_DIRS': True,
				'OPTIONS': {
					'context_processors': [
						'django.template.context_processors.debug',
						'django.template.context_processors.request',
						'django.contrib.auth.context_processors.auth',
						'django.contrib.messages.context_processors.messages',
					],
				},
			},
		]
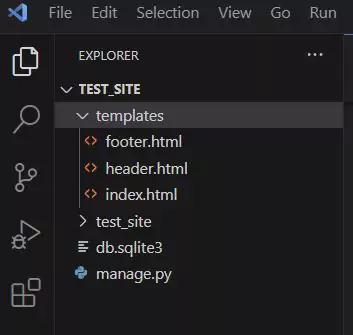
The templates folder we just specified will hold all the templates for our website. Next, we need to create this folder inside the test_site directory, where the manage.py file is located.
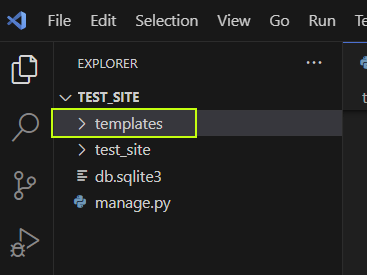
Inside the templates folder, we will create the various template components for our website, such as the header, footer, index, sliders, and any other templates you might need. Let’s start with the basic files: header.html, footer.html, and the main index.html. While it’s possible to include everything in a single file, I prefer separating them to make the code easier to manage and maintain.
How to convert or migrate a WordPress site to Django ( Step 3 )
Django views and urls
Next, we need to configure Django’s urls.py and views.py files to display our templates instead of the default Django page. First, return to the terminal and run django-admin startapp my_site to create the main website app. You can replace my_site with any name you prefer. Before running the command, make sure your terminal is in the test_site folder:
This will create a new folder named my_site. Inside this folder, create a new file called urls.py and leave it empty for now—we’ll come back to it later. Next, locate the urls.py file inside the test_site folder, where the settings.py file is located. The file should look like this:
		from django.contrib import admin
		from django.urls import path

		urlpatterns = [
			path('admin/', admin.site.urls),
		]
Adjust the from django.contrib import admin. Add a comma just after the admin and add include so the line will look like: from django.contrib import admin, include. Next, below the existing line path('admin/', admin.site.urls),, add path('my_site/', include('my_site.urls')). This connects the urls.py file from the my_site app to the main project, allowing Django to route requests to our app. In all, the file should now look like this:
		from django.contrib import admin
		from django.urls import path, include

		urlpatterns = [
			path('admin/', admin.site.urls),
			path('', include('my_site.urls')),
		]
Next, we’ll work on the urls.py and views.py files for our project. In the views.py file inside the my_site folder, we’ll define a function to display the index.html file we created earlier in the templates folder. Paste the following code into views.py, making sure the indentation matches the example below:
		from django.shortcuts import render

		def homePage(request):
			return render(request, "index.html")
Finally, open the urls.py file of the my_site and past the code below to it:
		from django.urls import path
		from . import views

		urlpatterns = [
			path("", views.homePage),
		]
If the server isn’t already running, start it by entering the following command in the terminal:
py manage.py runserver
After running the command in the terminal, reload the page in your browser. You should see a blank page—that’s the index.html file we created in the templates folder. It appears blank because we haven’t added any content yet. Open index.html, add some text, and reload the page to see your changes. Now that everything is working, it’s time to start migrating our WordPress site to Django.
In this guide, I will show how to convert one of my WordPress blogs into a Django website. The next step is to start exporting the HTML code from the WordPress site into our Django templates. We’ll export the header into header.html, the main homepage into index.html, and the footer into footer.html.
In WordPress, accessing the main source code of a website can be challenging due to its folder structure and the way WordPress stores data. While there are plugins that allow you to extract the source code directly, using them often brings along unnecessary code and broken links, which can complicate the migration to Django or affect your overall website performance.
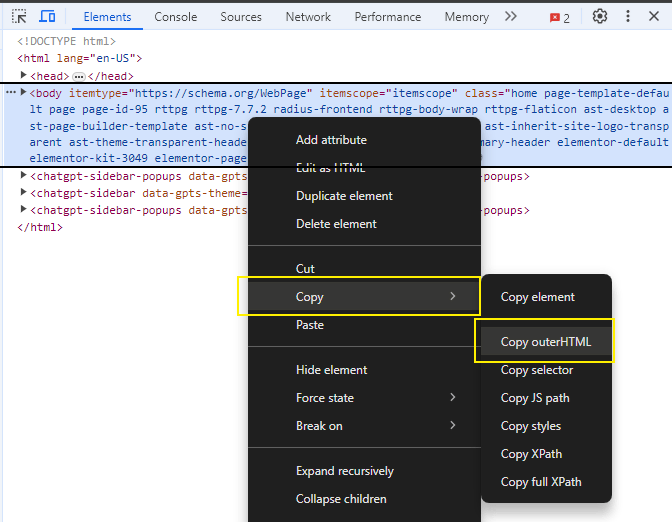
We’ll use the browser’s inspector tool to copy the HTML code of the site. This method is efficient because it allows us to eliminate unused code, remove PHP, and identify and fix errors on the fly. Open or visit your website, right-click, and select “Inspect” to access the elements. Then, copy the entire HTML into index.html file of the Django project, including the header, main content, and footer. We’ll separate the header and footer into their own files later.
First, open the index.html file located in the templates folder of your Django project. Open it in your code editor and add the HTML boilerplate, but exclude the <body> and </body> tags.
		<!DOCTYPE html>
        <html lang="en">
            <head>
                <meta charset="UTF-8">
                <meta name="viewport" content="width=device-width, initial-scale=1.0">
                <title>How to convert WordPress site to Django</title>
            </head>
        </html>
Now let's return to the inspector tool of the browser. Copy the header section from to
Go back to the index.html file in your Django project and paste the copied code right after the tag. Don’t worry about indentation for now—we’ll clean it up later as we remove unwanted code. If the server isn’t running, start it with py manage.py runserver in the terminal and reload the page. You should see your website loaded, though it may not look right yet. To fix this, we’ll also need to import the CSS from the WordPress site into our Django project.
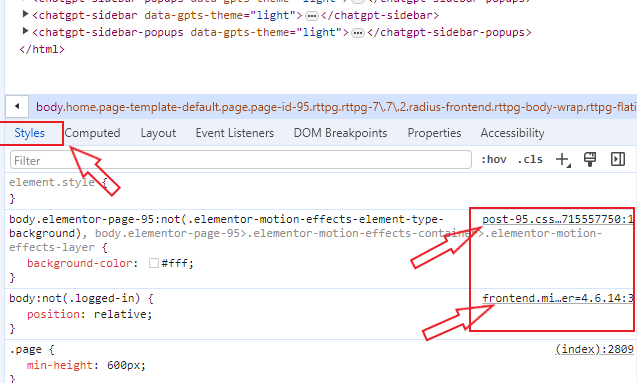
In WordPress, identifying the exact CSS files responsible for the front end can be challenging due to the large number of folders and stylesheets involved. The browser’s inspector tool makes this much easier. Return to the inspector and open the Styles tab. As you select different HTML elements, you’ll see the corresponding CSS files being applied. Clicking on a CSS link will open that stylesheet in a new tab.
Let's return to our Django project and create a folder where we can place our static files: css, JavaScript and images. We will talk more about static files later. In the test_site folder where the templates folder is located, create a new folder and name it static . Within the static folder, create a new folder and name it css and within this css folder, create a new file and name it style.css . you can give this file any name of your choice.
If you’re able to identify the main CSS file for your website, simply copy its contents and paste them into the style.css file we just created. If you can’t locate the CSS files through the WordPress admin panel or its folders, you can use the browser’s inspector tool, as shown earlier. Copy the CSS from the inspector and paste it into the style.css file. Keep in mind that your WordPress site may use multiple CSS files, so be sure to copy all relevant styles. If you need additional help, refer to the video guide.
Now that we’ve copied all the CSS into our Django project, the next step is to link the stylesheet to our site. Inside the templates folder—where the index.html file is located—create a new file named base.html. Open this file in your code editor and paste the code below:
		<!DOCTYPE html>
            <html lang="en">
            {% load static %}
            <head>
                <meta charset="UTF-8">
                <meta name="viewport" content="width=device-width, initial-scale=1.0">
                <title> How to migrate WordPress to Django</title>
                <link rel="stylesheet" href="{% static 'css/style.css' %}">
            </head>
            <body>
                {% block main_site_content %}

                {% endblock main_site_content %}
            </body>
        <html>
If you’re not familiar with what the code above does, I recommend reviewing my Django introduction guide first. Next, open the index.html file in the templates folder and remove all the code we added earlier. Then, paste the following code into the file:
		{% extends 'base.html' %}

		{% block main_site_content %}


		{% endblock main_site_content %}
Return to your WordPress site and copy the HTML code using the browser’s Inspector tool, as demonstrated previously. Copy the content from the tag to the tag. After copying the code, open the index.html file and paste the content between the {% block main_site_content %} and {% endblock main_site_content %} tags.
Finally, open the settings.py file and scroll to the bottom. You should see a line of code similar to STATIC_URL = 'static/'. Directly below this line, paste the following code:
STATICFILES_DIRS = [os.path.join(BASE_DIR, 'static')]
That’s it! If the server is still running, simply reload the page to see your site working correctly—often with faster load times than in WordPress. If you encounter any issues, verify that all files and folders are named correctly. If the CSS is not loading properly, ensure that you have copied all CSS files using the browser’s Inspector tool. You can also verify your WordPress site’s CSS by checking the section, as all CSS files are linked between the and tags. Additionally, you can watch the video version of this guide for a visual walkthrough.
Our WordPress site has been successfully converted to Django and is functioning correctly; however, the index.html file may appear cluttered. Let’s clean up the code to improve readability and maintainability. We can start by separating the header and footer into their own components. Additionally, remove any <script> tags, <link rel="stylesheet"> tags, and all <style> tags from the index.html file.
How to convert or migrate a WordPress site to Django ( Step 4 )
Any plugins installed on your WordPress site may inject additional HTML, CSS, JavaScript, or external links into the index.html file. As you review the index.html code, you can safely remove any elements that are not relevant to your Django implementation. I will prepare a different post on how to convert WordPress plugins into Django. To begin the cleanup process, let’s separate the header and footer sections from the index.html.
In the index.html file, cut the code from the <header> tag to the </header> tag and paste it into the header.html file you created inside the templates folder. If you do not see a </header> tag, simply cut the main <div> element that wraps your site’s navigation menu and paste it into header.html.
Repeat this process for the footer by cutting the <footer> tag—or any element that wraps the footer section of your website—and pasting it into the footer.html file.
Separating the header and footer from the main index.html file is completely optional; it is simply a personal preference to keep the codebase clean and well organized. This approach also saves time, as the same header and footer can be reused across multiple pages.
After removing these sections from the index.html file, the next step is to link the header and footer within the base.html template. Open the base.html file and, just before the {% block main_site_content %} tag, paste the following code:
{% include 'header.html' %}And after the {% endblock main_site_content %} , past this code:
{% include 'footer.html' %}Your base.html file should now look like this:
        <!DOCTYPE html>
            <html lang="en">
            {% load static %}
            <head>
                <meta charset="UTF-8">
                <meta name="viewport" content="width=device-width, initial-scale=1.0">
                <title> How to migrate WordPress to Django</title>
                <link rel="stylesheet" href="{% static 'css/style.css' %}">
            </head>
            <body>

                {% include 'header.html' %}

                {% block main_site_content %}

                {% endblock main_site_content %}

                {% include 'footer.html' %}

            </body>
        <html>
How to convert or migrate a WordPress site to Django ( Static files )
Our WordPress website has been successfully converted to Django and is functioning correctly; however, images may not be loading as expected. Let’s address this issue. As with the CSS files, you need to copy all images from your WordPress site into the static directory. Within the static folder, create a new directory named images (you may choose a different name if preferred). Finally, copy all of your image files into this directory.
Once all images have been placed in the images folder, you can display them on your website. Open the index.html file and add the following code at the very top of the file:
{% load static %}The {% load static %} template tag tells Django to load the static files template library. This enables the use of Django’s static template tag, which is required to correctly reference static assets such as images, CSS files, and JavaScript files within a template. Without loading this tag, Django would not be able to resolve paths to files stored in the static directory.
let’s assume you have an image called logo.png in your images folder. To display this image in your template, you can use Django’s static tag. First, make sure you have {% load static %} at the top of your file. Then, reference the image like this:
<img src="{% static 'images/logo.png' %}" alt="Logo">This tells Django to look for logo.png inside the static/images folder and generate the correct URL for your site. Using the static tag ensures that all your static assets are loaded properly, even when your project structure changes or when deployed to production.
Conclusion
That’s it! You’ve now seen how to successfully convert a WordPress website to Django. If you experienced any challenges during the migration or want to extend this setup further, I’m here to help. For more advanced migrations involving multiple pages, blog posts, or dynamic content, be sure to read my in-depth guide on how to migrate WordPress pages and posts to Django.
If you notice any errors in this article, have suggestions for improvement, or need clarification on any step, please leave a comment below—I genuinely appreciate your feedback. If you need hands-on help migrating your website, optimizing performance, or building a Django-powered solution, you’re welcome to contact me directly or email me at [email protected]. I’m also available for freelance work and full WordPress-to-Django migrations.


(0) Comments
(0) Comments waiting moderation
No comments so far. Join the discussion and make your voice heard.
All comments are reviewed before publication to help maintain a safe and respectful environment.